Setup Linked Roles on your Discord
Get started with Linked Roles on your Discord to improve your user experience by displaying important roles of users next to their names.
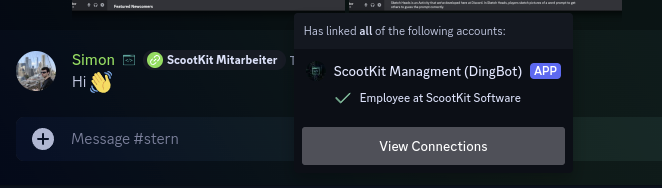
Unsure what Linked Roles are? Linked Roles allow you to display the role of a user next to their username, like this:
If you want to learn more about Linked Roles, you can do so in our About Linked Roles section.
Included in these plans
Video (German)
Our developer Simon is happy to guide you through this setup process in our tutorial video on YouTube. This video is in German right now, but we're working on an English translation.
0. Pre-Flight-Checklist 🛫
Before you can enable Linked Roles on your server, please ensure that
- you have added your Server to SCNX.
- your server has the paid Unlimited (€4.99 / month) or Professional (€7.99 / month) plan, or consider using a free trial, if available for you.
- you are the owner, a trusted admin with the Co-Owner permission or an administrator of the server you want to enable this feature.
- you've got 5-10 minutes of time (our estimate is that this takes around six minutes to finish on a computer, on mobile it may take a bit longer) to finish this guide - don't stop in the middle; your progress won't be saved.
1. Time to get started
To get started with the setup, please open the Linked Roles page of your server in the SCNX dashboard. There, click on "Start setup" to get started. You might be shown a video or a link to this guide, but you can also click "Continue" there, since you are already here 😉
2. Enter credentials
You'll need to create a new app in your Discord Developer Dashboard.
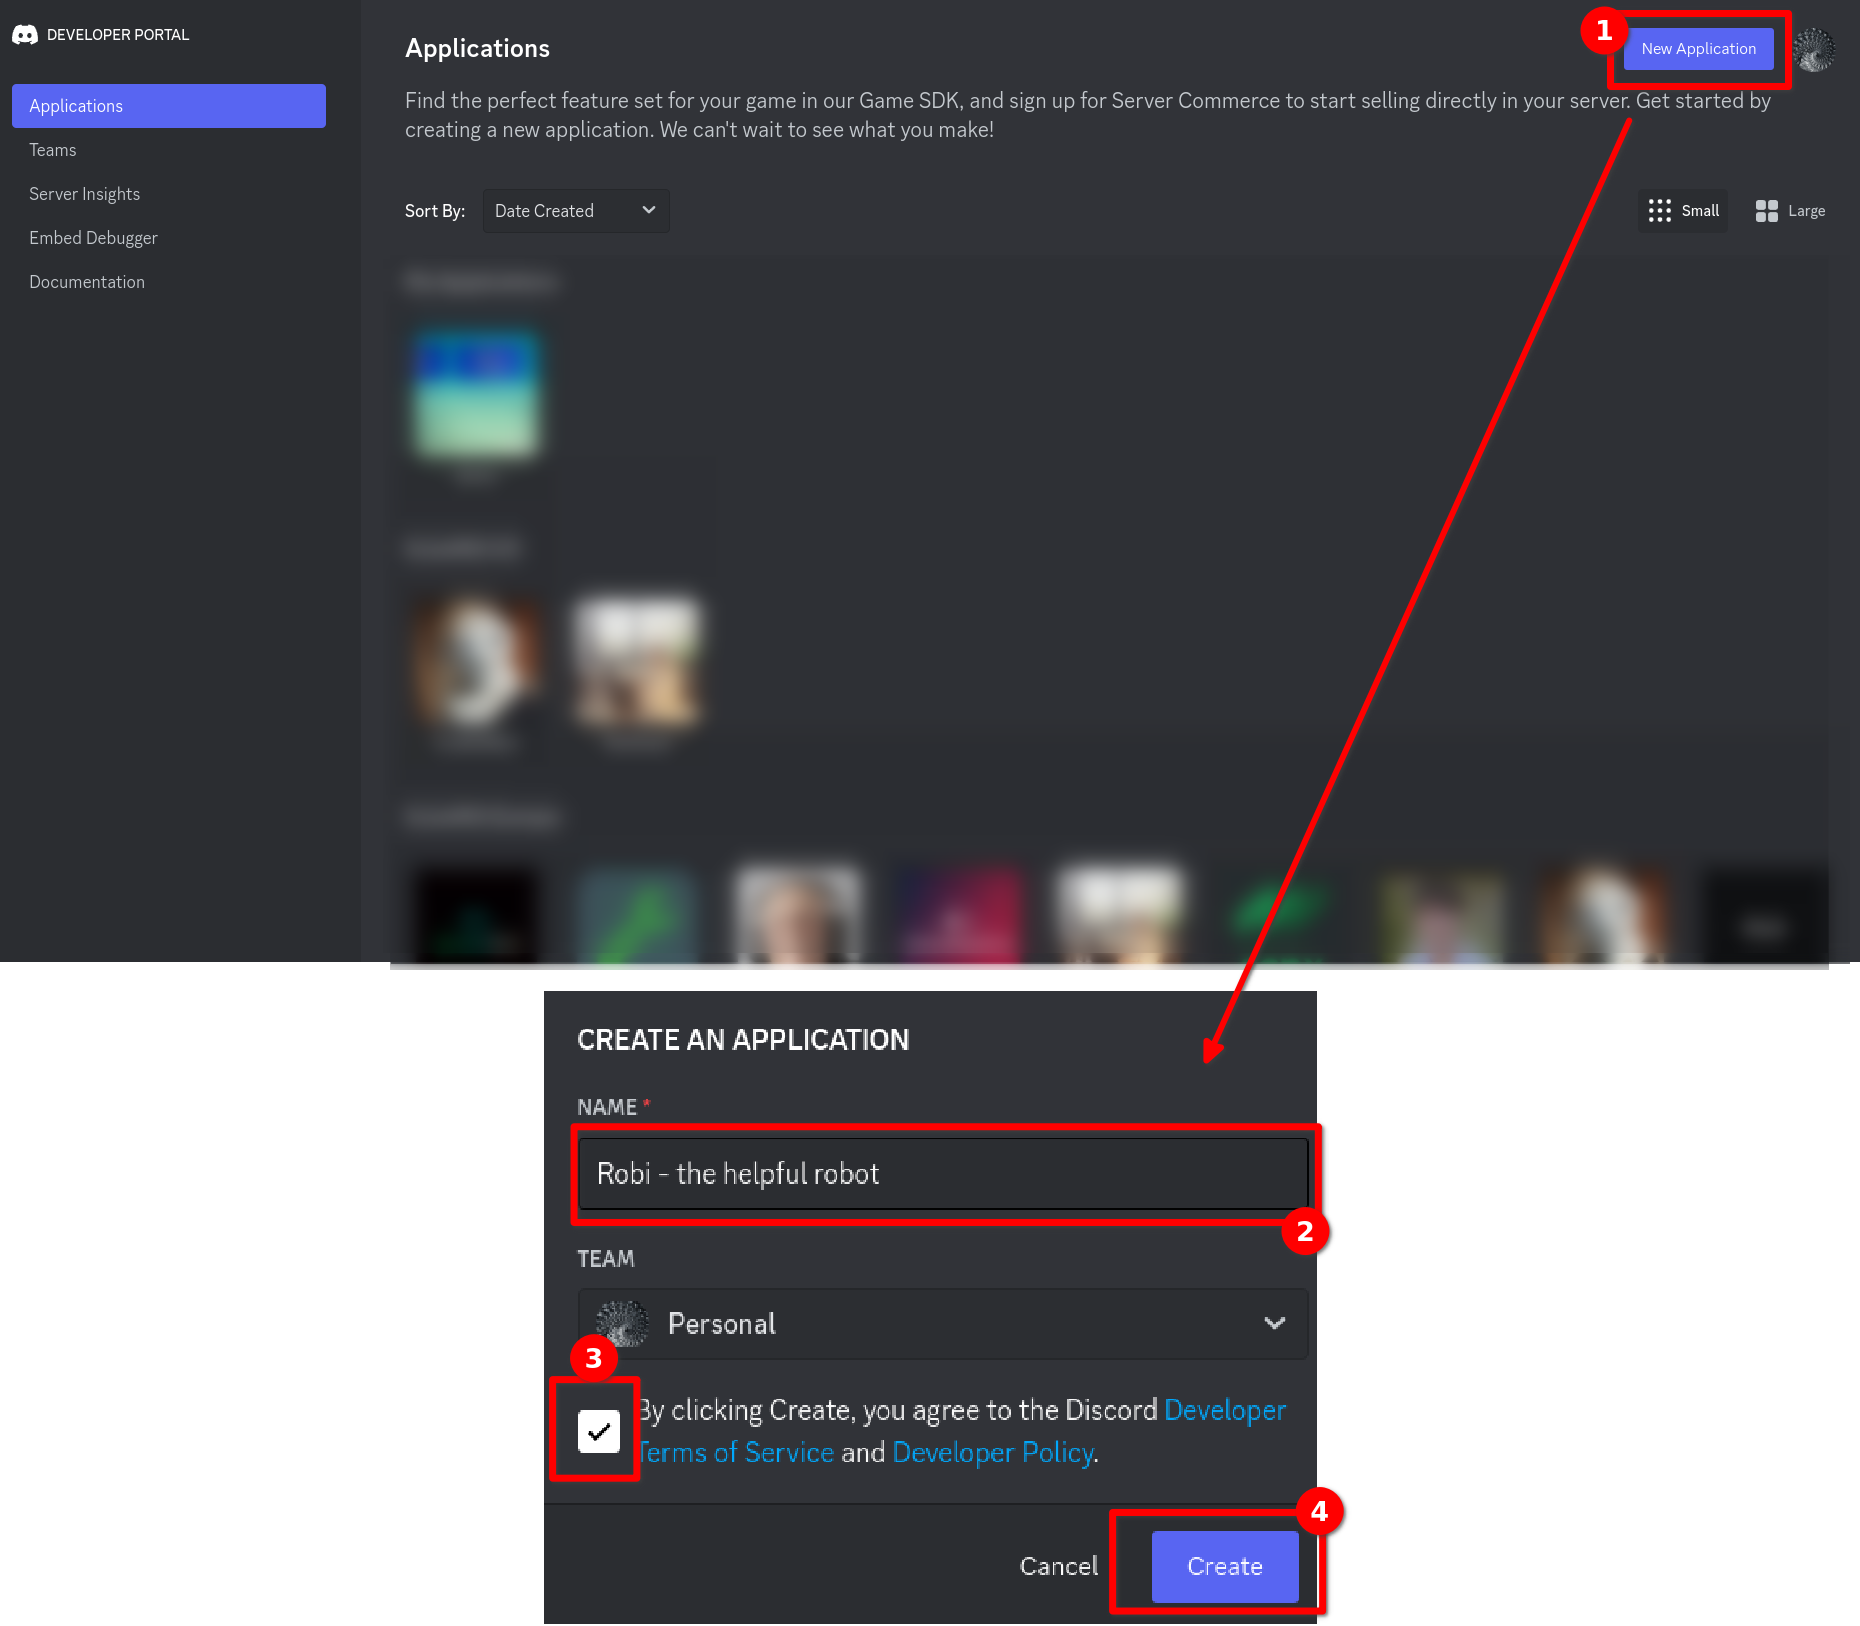
To do so, visit the Discord Developer Portal. There, create a new application by clicking on "New Application" on the upper-right side of your Developer Portal. A modal will open. Enter the name of the application (you can change this later), read & accept the Discord Developer Terms of Service and the Discord Developer Policy (these policies also apply to your use of the Discord API as part of SCNX) and create your bot by confirming with "Create".
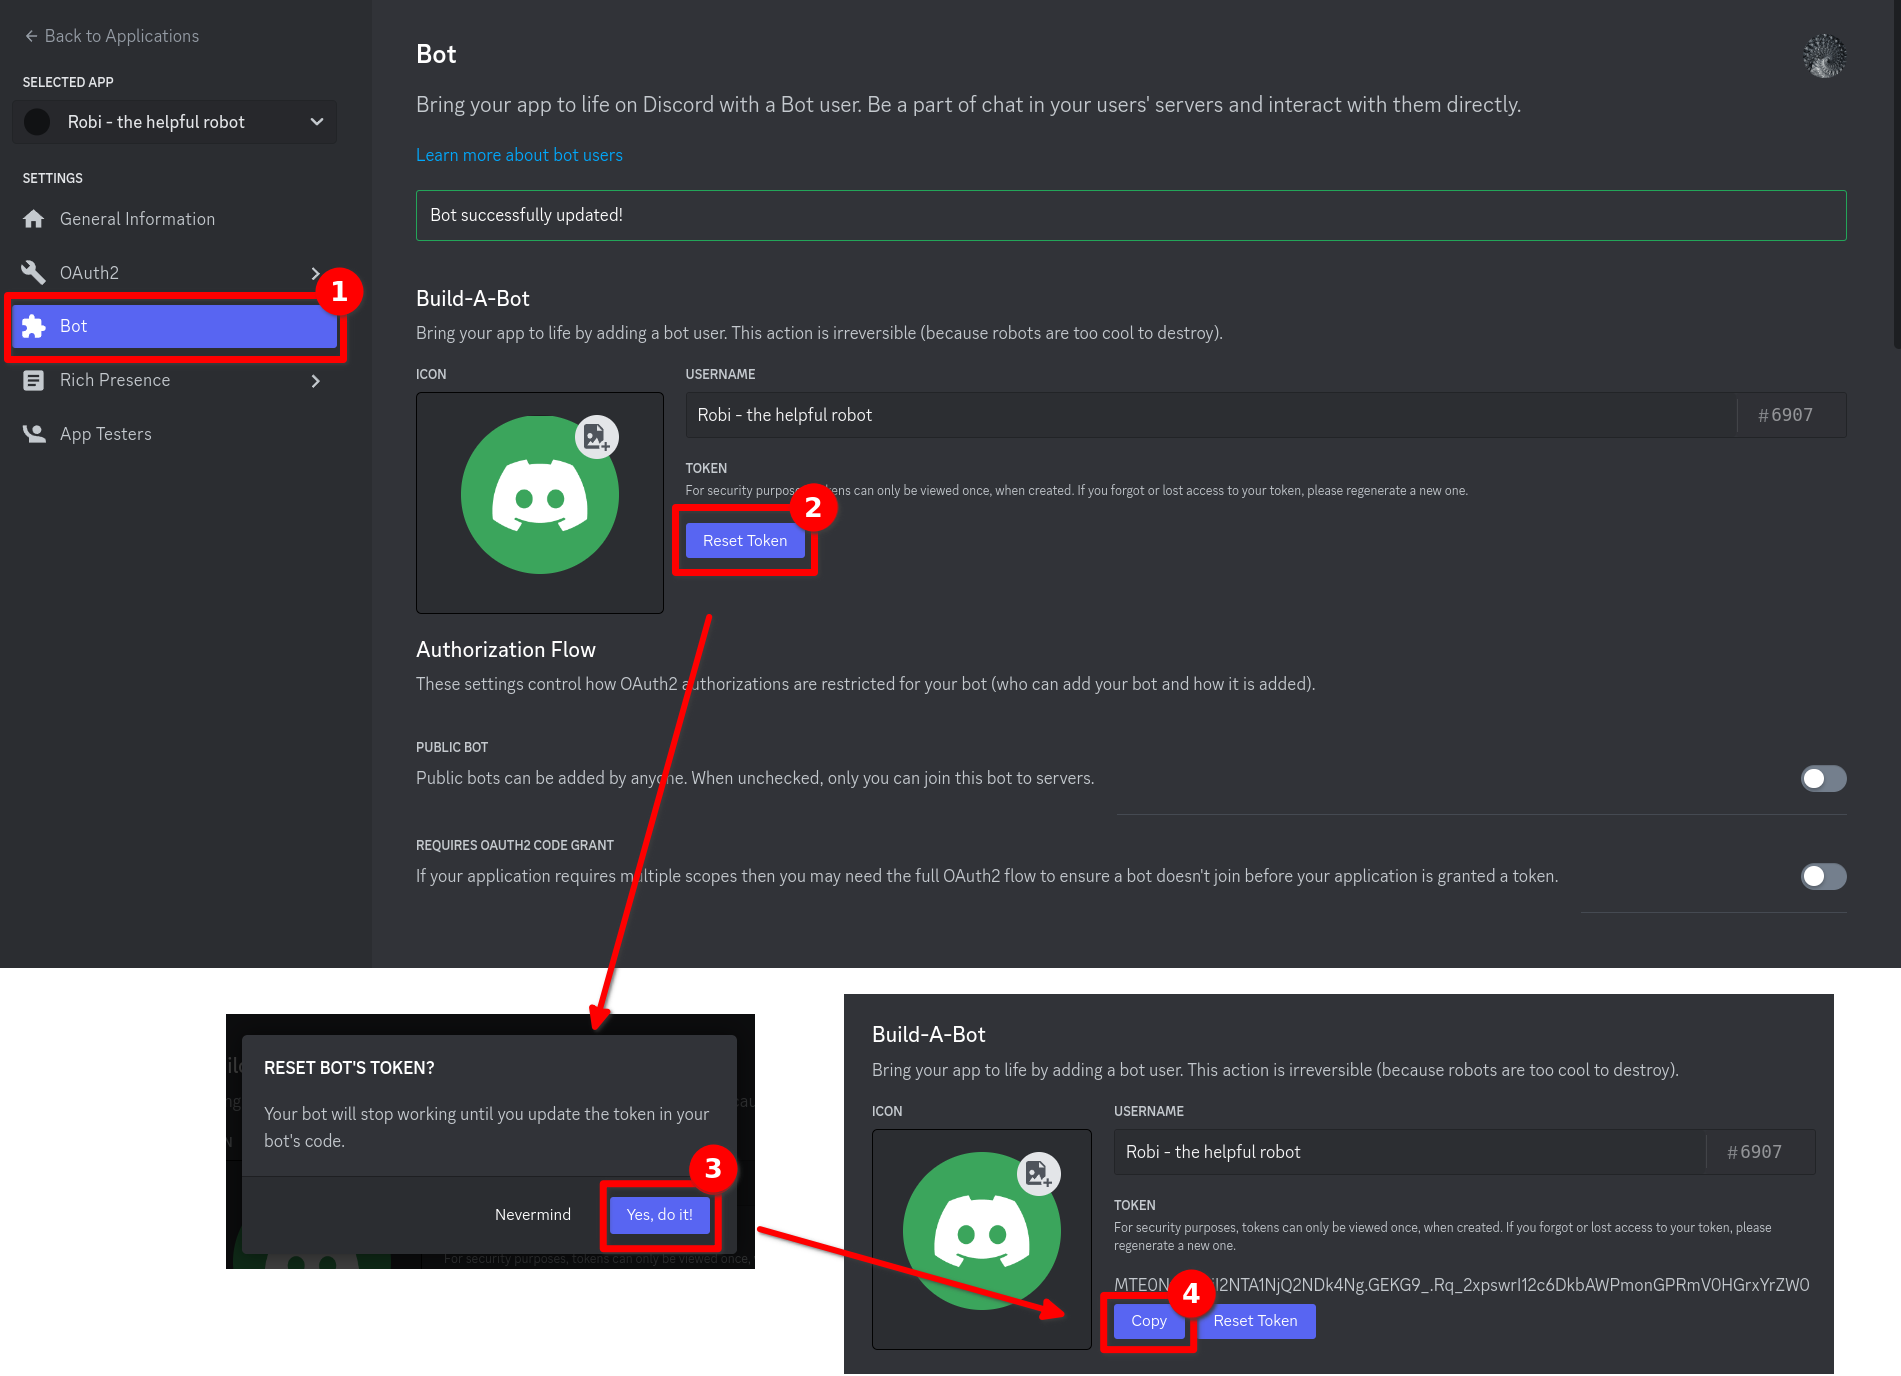
Next, open the "Bot"-Settings in the navigation bar on the left-hand side. There, you can configure the avatar and username.
The final step in the Developer Dashboard is to generate a token and copy it. To do so, open the "Bot" page of your application and click on "Reset token" (still on the Bot page) and confirm your request in the modal. You might get asked to enter a 2FA-Code for your Discord-Account.
Once done, please copy the token of your bot and enter it on SCNX.
Once done, SCNX will check your token and synchronize data with Discord. Once done, you can continue with the next step.
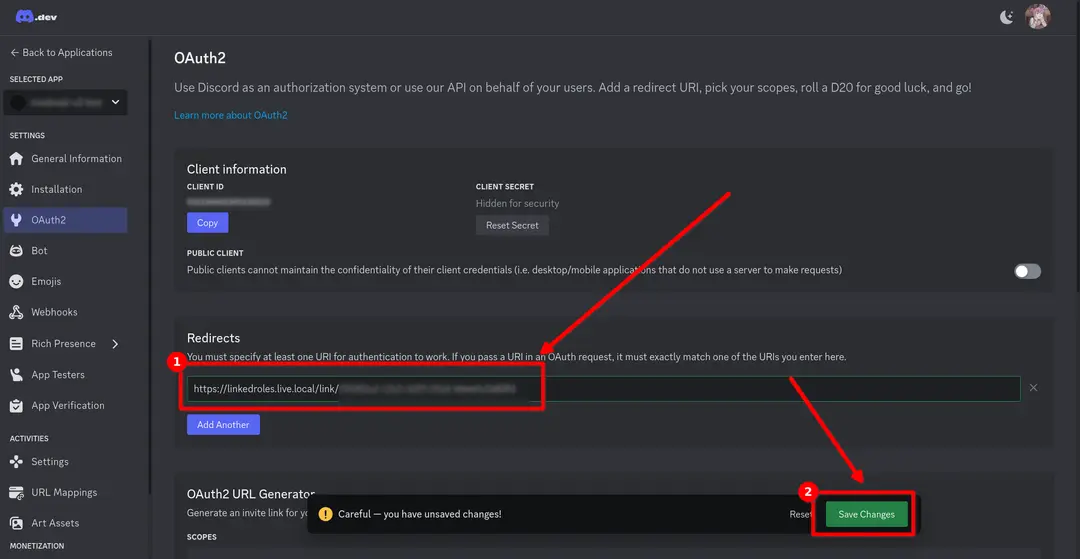
3. Save redirect URL
Once your credentials are checked and SCNX has synchronized some Linked-Role data with Discord, you'll need to open the Oauth2 page of your Discord Developer Portal. The easiest way to do so is to click on the link that is visible on SCNX. Alternatively, you can click on "Oauth2" tab in your developer dashboard.

Once you've opened the Oauth2 page, you'll need to copy and paste the redirect URL from your SCNX Dashboard. Doing this
is easy: Simply click on the URL shown in SCNX (this will copy the URL to your clipboard). If you are wondering, the
redirect URL should look something like this:
https://linked-roles.scnx.app/api/b4e5e89a-1c92-11f0-b688-03c2706e348f/callback (the middle part might change based on
your server).

Go back to the "Oauth2"-Page in your Discord Developer Portal. There, scroll to "Redirects", click on "Add another" and paste the URL you just copied in the text field. Remember to save your changes!
4. Enter Client Secret
There's a big difference between your Bot Token and Client Secret. Please double-check which value you are entering to avoid issues later. For this step, you'll need the Client Secret, not the Bot Token.
Once you've entered and saved the Redirect URL, please stay on the "Oauth2 page". Below "Client Information", generate the Client secret, by clicking on "Reset Secret" below the "Client Secret" field. Discord might ask you to verify your account by entering a 2FA code. Once this is done, you'll be able to copy the Client secret. Enter the copied value in your SCNX Dashboard and click on "Create Linked-Roles" to finish setup.

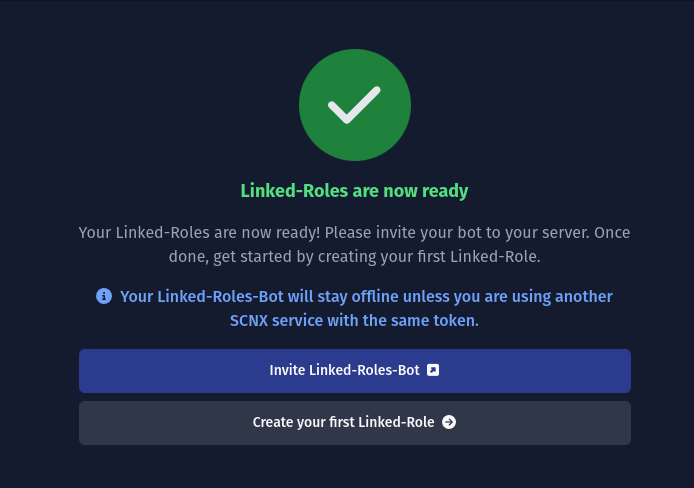
5. Time to party 🎉
Your new Linked Role Bot won't stay online unless you use another SCNX product with the same credentials.
Finally, finish setup by inviting the Linked Roles Bot to your server. Do so by clicking "Invite Linked-Roles-Bot" in the dashboard. Once done, you can continue by creating your first Linked Role. To learn more about that, continue in our Role management documentation, where we explain how to create your Linked Roles on SCNX and on Discord. You can also jump to the Linked Roles index page if you are looking for something else to continue with.