Sharing & the marketplace
In Custom Commands V3 you share automations as modules. A module bundles flows with their settings and storage, so whoever adds it gets a complete, working feature. A module you install from the marketplace is called an app.
You can install apps that others built, send your own module to a friend with a private link, or publish it on the marketplace for every SCNX server to find.
Install an app
- Find an app on the marketplace, or open a share link someone sent you.
- Click Add to server.
- Pick your server. Only servers with Custom Commands V3 turned on can be picked. See Moving from V2 to turn it on.
- Read Before you add this. It lists the Bot permissions the app needs, the Gateway intents it uses, the Commands it adds, any External requests it makes and its Resource weight.
- Tick the box to confirm you understand that the app was made by a third party and acts with your bot's permissions.
- Click Add to server.
The app then shows up under Apps on your custom commands overview. If it needs settings, a setup wizard walks you through them.
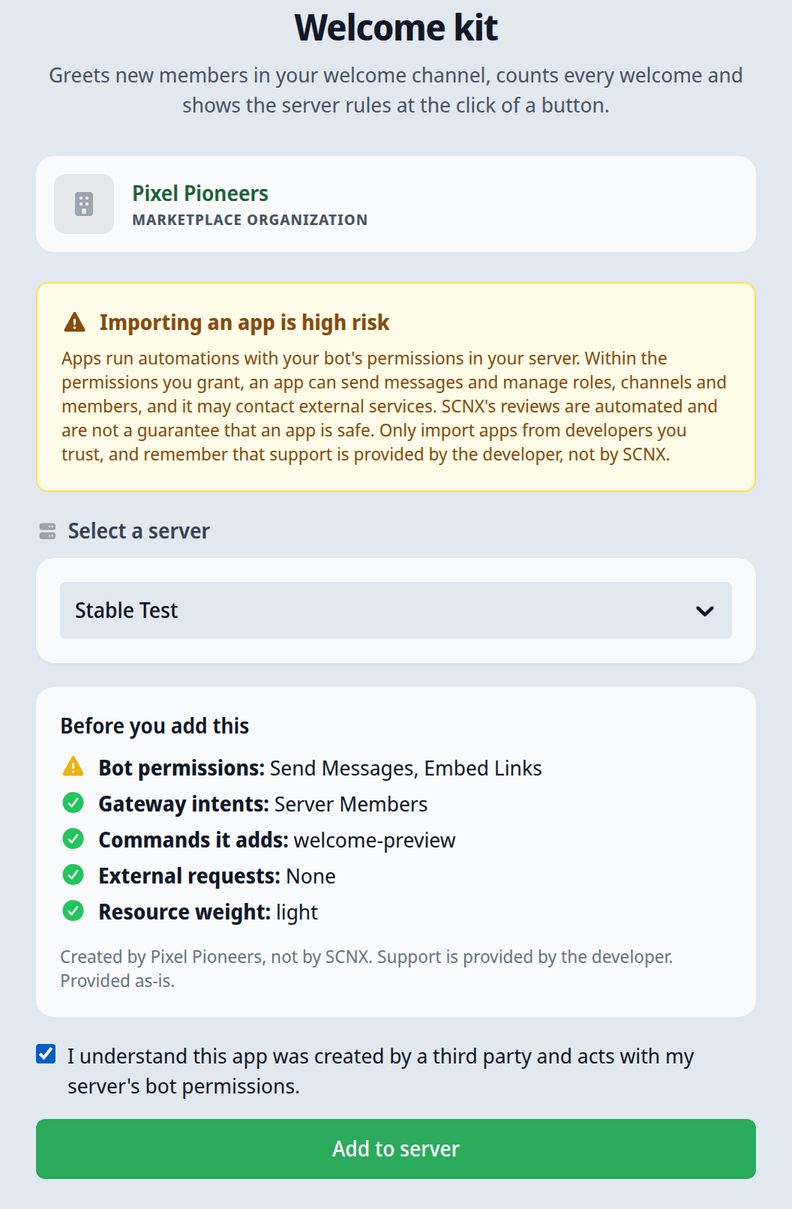
Apps run with your bot's permissions on your server. Within those permissions, an app can send messages, manage roles, channels and members, and it may contact external services. Our reviews are automated and are not a guarantee that an app is safe. Support for an app comes from its developer, not from SCNX.
Apps opened through a share link are not part of the public marketplace, and our team hasn't looked at them by hand. You'll see a warning and an extra checkbox for those. Only add them if you trust the person who sent the link.
If the app is already on your server, the import page tells you which version you have and sends you to the updates page instead. You can still add a second copy with Import as a new copy.
What the rows under Before you add this mean:
| Row | What it tells you |
|---|---|
| Bot permissions | Discord permissions your bot needs for the app's steps. Without them, those steps fail with MISSING_PERMISSIONS. |
| Gateway intents | Extra Discord access the app's triggers need. Some must be switched on in the Discord Developer Portal. |
| Commands it adds | The slash commands the app registers. A name your bot already uses means that command won't be added. |
| External requests | The outside services the app sends data to. "External services" means it builds the address while running. |
| Resource weight | How much activity the app is likely to use. A heavy app uses more of your activity budget. |
When installing fails
| Message | Fix |
|---|---|
| "Custom Commands V3 not enabled" next to a server | Turn on V3 for that server first. |
| "This app is already installed on this server" | Update it on the App updates page, or click Import as a new copy. |
| "This server already has ... apps installed, the maximum" | Uninstall an app you no longer use, then try again. |
| "Your bot needs an update before it can install this app" | Restart your bot so it runs the newest version, then try again. |
| "This shared Custom-Command could not be found" | The link is wrong, or the listing was removed. |
After installing
Open an app from the overview to see its Overview, Settings, Help and Advanced tabs:
- Overview shows what the app does and whether everything is set up. If your bot is missing a permission the app needs, you'll see it here.
- Settings is where you configure the app, for example which channel it posts in.
- Help has the developer's guides, FAQ and a link to their support channel.
- Advanced has Show developer tools, with the app's flows, stored data and run history. Editing the flows here marks the app as Edited, and updating it later overwrites your edits.
The Overview tab tells you the app's state:
| Message | What to do |
|---|---|
| "Everything's set up and running." | Nothing. |
| "Almost there. Set ... to finish setup." | Click Finish setup and fill in the missing setting. |
| "The bot is missing the ... permission it needs to run this app." | Give your bot that permission on your server. |
| "This app ran into an error." | Check its run history, and contact the app's developer. |
| "This app is stopped by the server-wide emergency stop." | Turn custom commands back on from the overview. |
| "SCNX disabled this app for policy reasons." | The app can't be turned on unless that restriction is lifted. |
To remove an app, click Uninstall app on the Advanced tab and type the app's name to confirm. This removes the app, all of its flows and, after a while, its stored data. It can't be undone from the dashboard.
Keep apps up to date
When the developer publishes a new version, the overview shows how many apps have an update. Open App updates under Data & history to see them all, with each app's changelog.
To update one app:
- On the overview, under Data & history, click App updates.
- Read the changelog shown under the app. It lists every version since yours.
- Click Update.
Update all updates every app you haven't changed yourself, one after another. A message then tells you how many were updated, how many failed and how many were skipped because you edited them.
Your settings carry over where the new version still has them. A setting the new version removed, or one whose value no longer fits, is dropped. Your stored data stays. If the new version needs a setting it didn't have before, the app is turned off until you fill it in.
If you've edited an app
Apps whose flows you changed are marked Edited and are left out of Update all. When you update one of them on its own, you're asked to confirm, because updating replaces your changes with the developer's new version. Your current setup is moved aside first, but your edits to the flows are overwritten.
If you see "Your bot needs an update before it can apply this update", restart your bot so it runs the newest version, then try again.
Share a module with a link
There's no separate share link for a single flow. To share your work, put it in a module and publish it. A freshly published module is Unlisted: it doesn't show up when people browse the marketplace, but anyone with its share link can view and install it.
To share an Unlisted module, open the module and click Copy share link in the Marketplace card. Send that link to anyone you like.
Want to move a few steps instead? Copy them in the flow editor with Ctrl+C or the copy button on a step, then paste them into another flow from the Clipboard section of the action picker. Steps that used settings or stored fields the other flow doesn't have are pasted anyway and flagged for you to fix.
Share links for V2 custom commands still work, but they import into V2. See Custom Commands V2.
Example: share a module with a friend
You built a giveaway module and a friend wants it on their server.
- Open your module, go to the App tab and work through Your path to the marketplace.
- Click Publish. Wait for the automatic review. The module is now Unlisted.
- In the module's Marketplace card, click Copy share link and send it to your friend.
- Your friend opens the link and sees a banner that the app isn't part of the curated marketplace.
- They click Add to server, pick their server, check Before you add this, tick both boxes and click Add to server again.
- The app opens on their server. If it has required settings, the setup wizard asks for them, like the giveaway channel.
When you publish an update later, your friend sees it on their App updates page.
Publish a module
Modules are published by an organization, even if it's just you. Open your module and go to its App tab. The Your path to the marketplace checklist shows what's left to do:
- Create or join an organization. If you already have an invite link from an organization, open it to join instead.
- Accept the Shared Content terms. Your organization agrees to them once.
- Set a support location, a website or Discord invite where people can reach you.
- Add a name and description that say clearly what your app does.
- Describe what your app does. Each visible flow becomes a feature with its own short description.
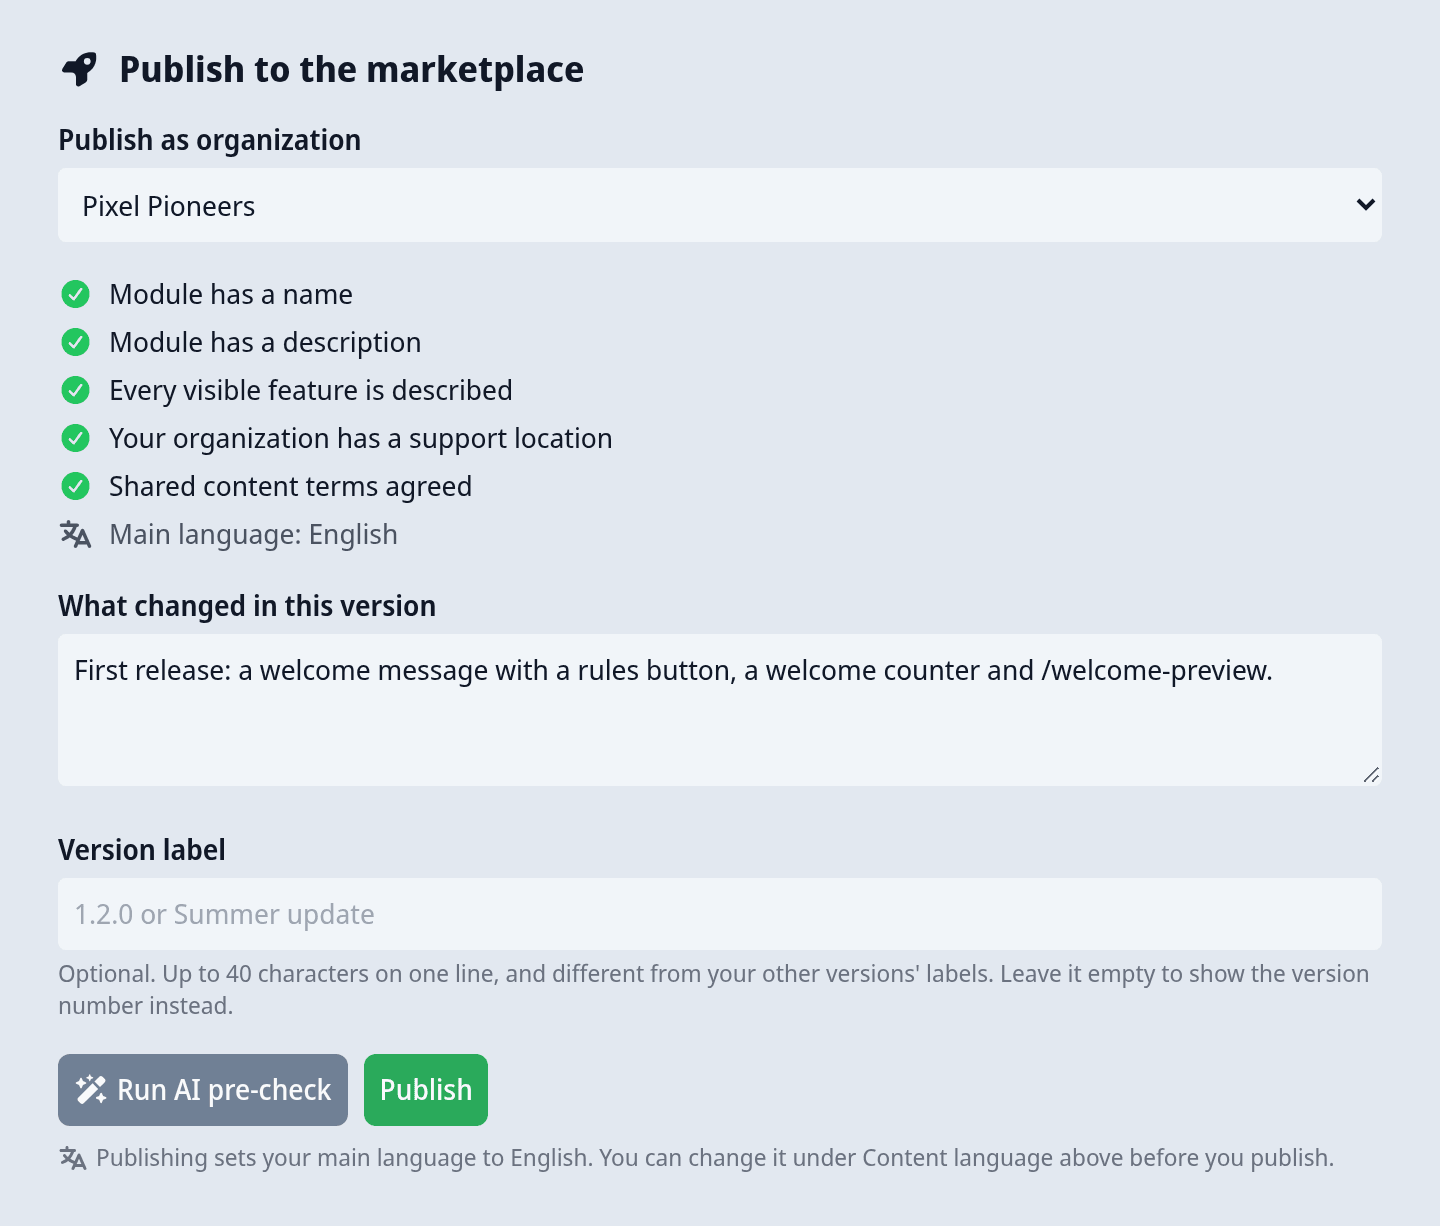
- Publish. Under Publish to the marketplace, pick your organization, write What changed in this version, and click Publish. You can Run AI pre-check first to catch problems early.
Things to know before you publish:
- Content language. The first publish sets your app's main language, the one you wrote it in. Shoppers find your app under that language, and translations are made from it. Once your listing has translations, you can't change it.
- The checklist gates the button. Each row under Publish to the marketplace must be done: a name, a description, a description for every visible feature, a support location, and the Shared Content terms.
- Only the owner of an organization can accept the Shared Content terms. Members need the Manage Content permission to publish updates.
- "Couldn't load all of this app's flows" pauses publishing. Wait a moment and try again, so nothing is left out.
Every version goes through an automatic review before it goes live. Once it passes, your app is Unlisted and you can share its link.
Get listed in the marketplace
To show up when people browse the marketplace, apply for Listed in your publisher dashboard. Our team reviews the app before it becomes public. Apps can also be Featured.
Once your app is public, our team also takes one more look at every update before it ships. Your current version keeps running for every server that has it until the new one is approved, and you get an email when a decision is made. If you disagree with a decision, use Appeal this decision (opens a support ticket).
| Status | What it means |
|---|---|
| Unlisted | Live, but only reachable through its share link. |
| Curation requested | You applied for a public listing and our team is reviewing it. |
| Listed | Public. People can find it when they browse the marketplace. |
| Featured | Public and highlighted in the marketplace. |
| Changes requested | Our team asked you to change something before it can be listed. |
| Removed by SCNX | The listing was taken down. Its public page and share link no longer work. |
Publish an update
Keep building in your own module. When you're ready, open the module and click Publish update. Every server that installed your app sees the new version on its updates page, with the changelog you wrote.
You can give each version an optional Version label, like "Summer update". It has to be a single line and different from your other versions' labels. Leave it empty to show the version number.
If your app is public, the update waits for our team's check, and servers keep the version they have until then. If the update is rejected, your previous version stays live. Reply in the support ticket, then publish a new version.
If you publish again before our team reviewed the last version, that version is skipped and only the newest one is reviewed.