Modules & templates
Custom Commands V3 is in active beta, and we're changing a lot of things as we go. We'll be reworking this documentation once the current beta cycle wraps up, so some details on this page may be outdated in the meantime.
A module bundles several flows that belong together, like all the flows of a ticket system or a leveling system. It has its own settings page, its own storage and its own folders, and you can turn the whole module on or off with one switch.
Small, single-purpose flows don't need a module. Use one when flows share data or settings, or when you want admins to change channels, roles and texts without opening the flow editor.
You don't have to build everything yourself. Ready-made modules from other creators, like ticket systems or leveling, are on the marketplace. Installed ones show up under Apps on your overview. See Sharing & the marketplace.
Modules and loose flows
Flows outside a module share your server's storage, which you find under Server storage on the overview. Flows inside a module only see that module's own settings, storage fields and flows. That keeps modules independent: a module can't break because another one changed, and you can publish it as an app without taking the rest of your setup with it.
Create a module
- On the Custom Commands V3 overview, click New module.
- Enter a Module name and a Description.
- Pick an Icon. Search by name or open a category to see every icon in it.
- Pick a color, then click Create module.
The module's page opens. A new module is enabled right away, but it has no flows yet, so nothing happens until you add some.
To change the name, description, icon or color later, click Edit on the module's page and save.
Your server can only hold a certain number of modules, and a module a certain number of flows. If you reach a limit, the dashboard tells you. See Plans, limits & safety.
The module page
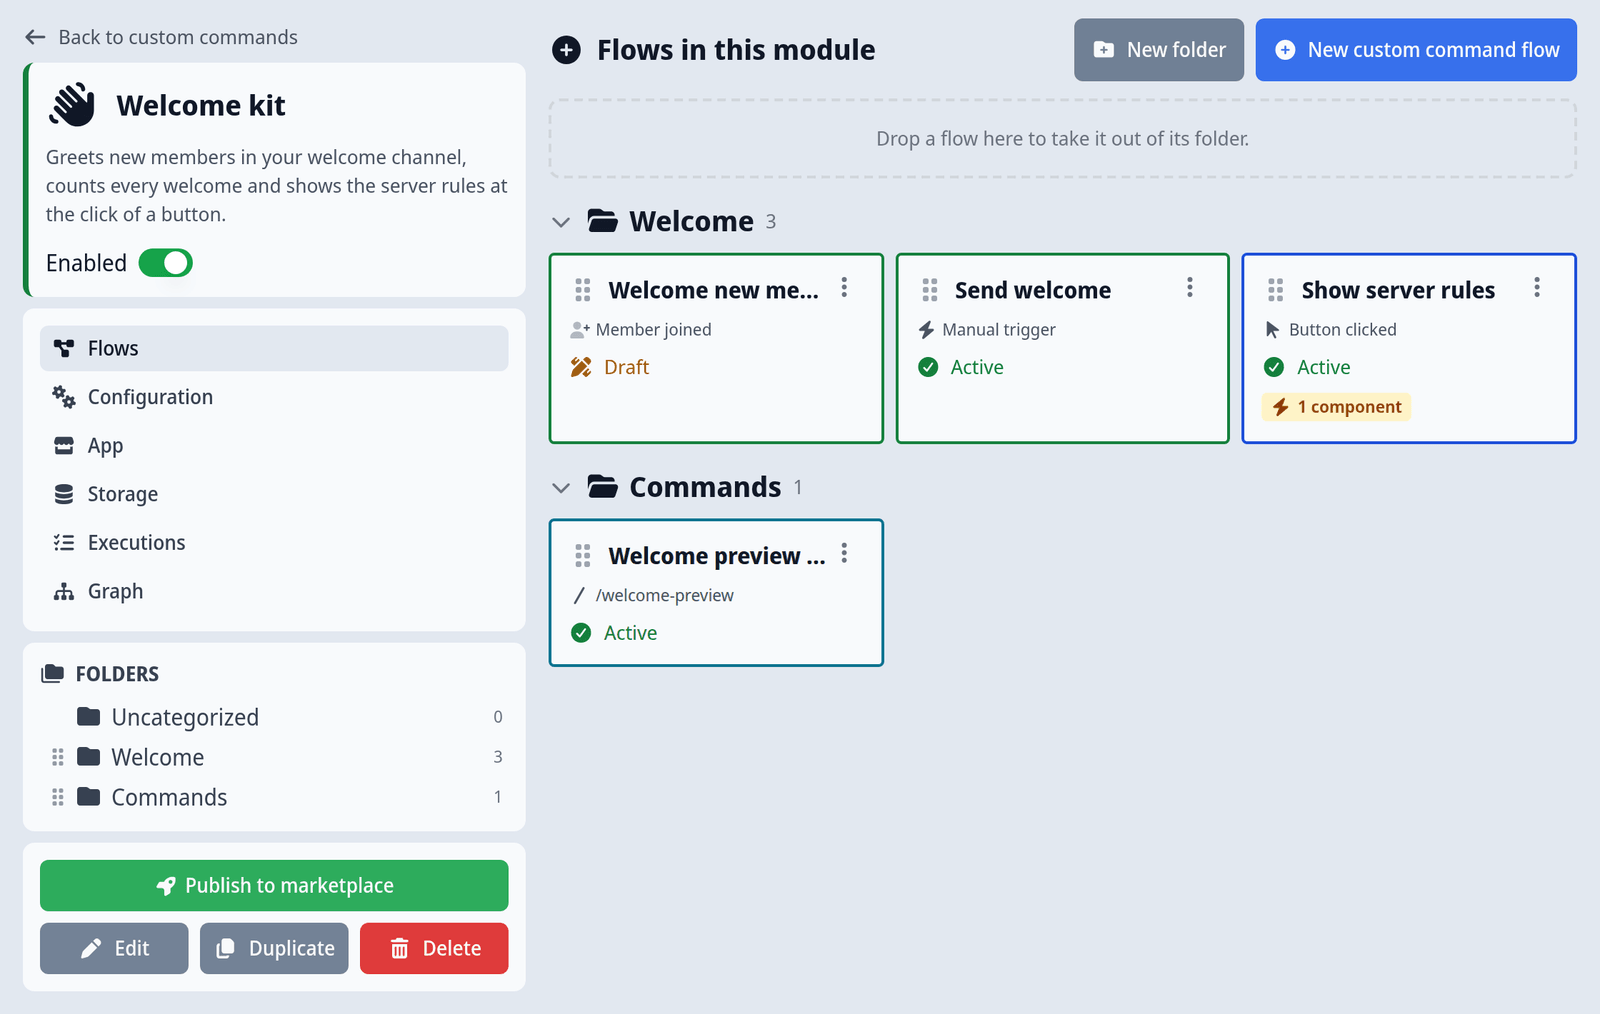
The header shows the module's icon, name and description, and these controls:
- The Enabled / Disabled toggle turns the whole module on or off.
- Publish to marketplace shares the module with other servers. See Sharing & the marketplace.
- Edit changes the name, description, icon and color.
- Duplicate and Delete, see below.
The navigation next to it leads to the module's parts:
| Entry | What you do there |
|---|---|
| Flows | The module's flows and folders. New custom command flow and New folder work just like on the overview. |
| Configuration | The module's settings page, and the layout of that page. See Module settings. |
| App | The page people see when you publish the module as an app. See Sharing & the marketplace. |
| Storage | The module's storage fields and the data its flows stored. See Data storage. |
| Executions | Every run of the module's flows. See Run history & debugging. |
| Graph | A map of how the module's flows fit together. See The module graph. |
Turn a module on and off
A flow inside a module runs only when both are true: the flow is Active and its module is Enabled. Switching the module to Disabled stops all of its flows at once, without changing each flow's own on/off state. Switch it back and every flow that was active runs again.
While the emergency stop is on, modules show Enabled - stopped. Their setting is kept, and nothing runs until you turn custom commands back on.
The module graph
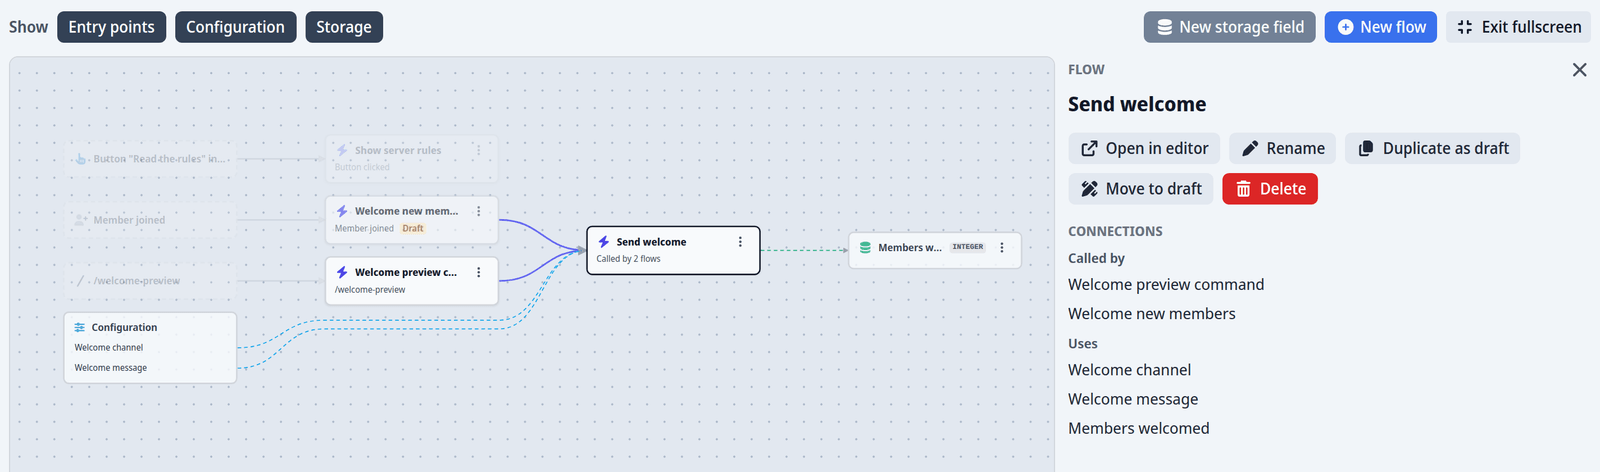
Graph draws every flow of the module as a box, with lines for what starts it, which flows it calls or books, which buttons lead to it, and which settings and storage fields it uses. Use Show to switch the Entry points, Configuration and Storage layers on and off.
- Click a box to see its Connections, like Started by, Calls, Uses and Used by.
- A flow marked "Nothing starts this" has no trigger, button or other flow that starts it. That is often a forgotten piece.
- A storage field marked "Not used" isn't used by any flow.
- "Missing flow" or "Missing field" means something points at a flow or field that no longer exists.
- From a box's menu, Open in editor, Rename or Delete it. The toolbar adds a New flow or a New storage field.
The graph needs your bot to be online. If it isn't, you see "The graph cannot load right now".
Module settings
Settings let server admins change what a module does without touching its flows: which channel to post in, which roles count as staff, what the welcome message says. The Configuration page has two tabs.
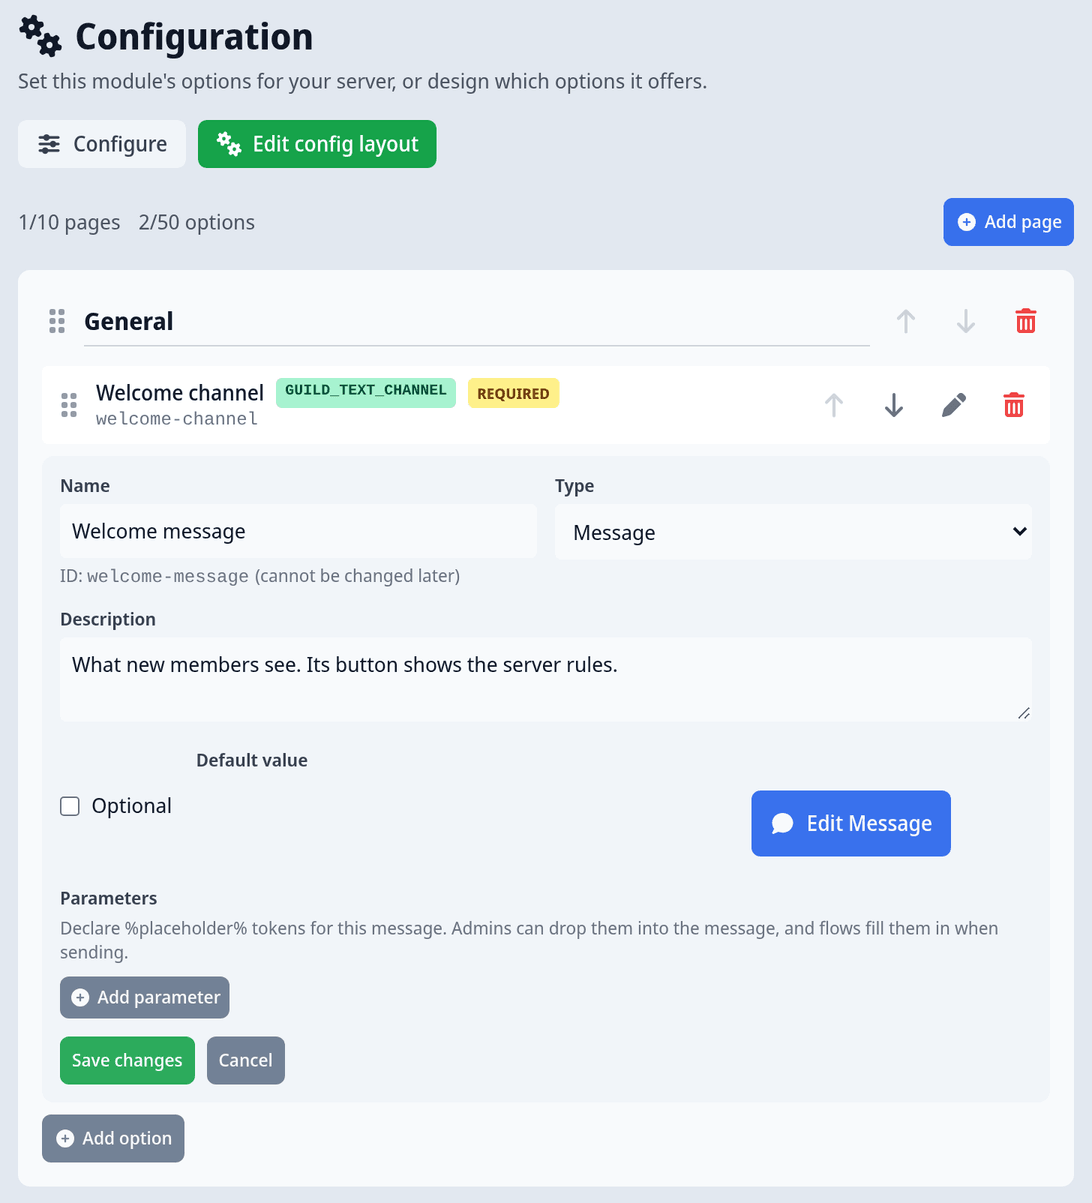
Design the settings page
On Edit config layout, you decide which settings the module offers:
- Click Add page to add a page of settings. Bigger modules can split settings across several pages.
- Click Add option and fill it in:
- Name: what admins see. The ID is made from the name and cannot be changed later, because flows refer to the setting by it.
- Type: for example Text, Whole number, Yes/No, Duration, Text channel, Role, User, Message, or a list of text, numbers, channels, roles or users.
- Description: a short help text for admins.
- Optional or Required, a Default value for simple types, and Limits like a minimum and maximum.
- For Message settings, add Parameters:
%placeholder%names that admins can use in their message and that your flows fill in when they send it. See the second example below. - Click Save changes.
To reorder, use the arrows or drag. Move option to another page moves a setting without changing its ID, so every flow that uses it keeps working.
If your change would break flows, for example because you deleted a setting a flow uses or changed its type, you see "flows would stop working" with a list of them. Save anyway stores the change, and those flows stay off until you fix them. Cancel keeps your change unsaved, so you can open the flows first with Open flow in a new tab.
Fill in the settings
On Configure, admins set the values for your server and click Save changes. Most settings apply right away. Some, like schedules, are only read while your bot starts up, so you're asked "Reload your bot's configuration now?". Click Reload configuration now to apply everything at once. If you click No, thanks, the page reminds you with Reload configuration until you do.
Things that can go wrong here:
- "Your configuration values could not be saved because they are invalid." A required setting is empty or a value is outside its limits. The form marks the setting.
- Values for settings the module no longer has. If you removed a setting from the layout, its old value can stay behind, and your bot refuses to save the configuration. Remove it with the button next to it, or Remove all of them, then save.
- Save conflict. Someone else saved the settings while you were editing. Choose Load the newest version or Overwrite with my version.
Use settings in your flows
Inside the module's flows, settings show up in three places:
- In the value picker, under Module settings. See Values, variables & messages.
- In trigger settings that support it, through Use module setting. For example, a Message created trigger can limit itself to the channels an admin picked, or a Schedule can use a schedule an admin picked. The setting has to be of exactly the type the trigger setting needs. If it isn't, the editor says which type to add.
- In the Cooldown card, through Override with a module setting.
Example: a welcome module
Turn the welcome template into a module that admins can set up themselves.
- Create a module named "Welcome".
- Under Configuration, open Edit config layout, click Add page, then Add option. Name it "Welcome channel", set the Type to Text channel and save.
- Switch to Configure, pick your channel, and save.
- Under Flows, click New custom command flow and pick the Welcome new members template.
- In the Send message step, click Use value on Channel and pick "Welcome channel" under Module settings.
- Save the flow and turn it on.
Admins can now change the channel on the module's Configure tab, and the flow follows without being edited.
Example: a welcome message admins can write
Building on the example above, let admins write the welcome text themselves, with the new member's mention in it.
- In Edit config layout, add an option "Welcome message" with the Type Message.
- Under Parameters, click Add parameter. Name it
memberand describe it, for example "Mention of the new member". Save the layout. - On Configure, write the message, for example "Welcome %member%, glad you're here!", and save.
- In the flow, click Use value on the Message input of Send message and pick "Welcome message" under Module settings.
- Below the message input, Message parameters now says "This message declares %parameters%. Fill in a value for each." and shows a row for
member. Set it with Use value to the Mention of the new Member. - Save. When someone joins,
%member%turns into their mention.
If an admin removes a parameter's %name% from the message, nothing breaks: the value just isn't shown. If you delete the parameter from the layout, the sending step shows "this message no longer declares it". Remove the leftover row there.
Templates
When you create a flow, Start from a template offers ready-made flows. Each one is created as a draft, so you can look at it and adjust it before you turn it on.
| Template | What it does |
|---|---|
| Blank flow | Starts from scratch with an empty flow. |
| Greeting responder | Replies in the same channel when someone sends "!hello". |
| Welcome new members | Greets new members with a personal message in a channel of your choice. |
| /warn command | Warns a member with a user and a reason, counts their warnings in storage and DMs them, with a fallback if DMs are closed. |
| /remind command | Lets members schedule a reminder. A second flow, "Deliver reminder (scheduled)", is created with it and sends the DM when it's due. |
Templates work the same on the overview and inside a module. Some of them use channels or storage fields you still have to pick or create. The Issues tab tells you what's missing.
Some templates need setup before they can be turned on:
- Welcome new members sends to a placeholder channel. Pick your channel in its Send message step.
- /warn command counts warnings in a storage field called
warnings. If you don't have it, the Issues tab flags it, and you can create the field from the editor. - /remind command creates two flows. Turn both on.
For complete systems built by other people, browse the marketplace.
Duplicate and delete a module
Duplicate copies the module with all of its flows, its settings and its storage fields. The data your flows stored is not copied. The copy starts disabled. Turn the original off before you turn the copy on, or both react to the same commands and events.
Duplicate can also fail: when your server already has as many modules as it can hold, when the copy would take your server over its flow limit, or when the module doesn't pass its checks right now. The message tells you which. Flows that can't be switched on in the copy are kept as drafts, and a note says how many.
Delete removes the module and every flow in it. Type the module's name exactly to confirm: the Delete module button stays greyed out until it matches. You can't undo this from the dashboard. To stop a module for now, switch it to Disabled instead.
Apps you installed from the marketplace can't be duplicated. Install the app again to get a second copy.
Move modules between servers
There is no file export or import for modules yet. To use a module on another server, publish it to the marketplace, even as an unlisted app that only people with the link can find, and install it there. See Sharing & the marketplace.
Within your own server, you can copy single steps between flows with Ctrl+C and Ctrl+V. See Edit, move and organize steps.
Common mistakes
| What happens | Why, and how to fix it |
|---|---|
| A module setting doesn't show up in the value picker | The flow isn't in this module, or the setting's type doesn't fit the input. Loose flows can't use module settings. |
| Use module setting says "only inside a module" | The flow is a loose flow. Create it inside a module instead. |
| A changed schedule or setting has no effect | It's only read while your bot starts up. Click Reload configuration. |
| Commands react twice after duplicating | The original and the copy are both enabled. Disable one of them. |
| A button in a module setting's message can't find your flow | Module flows can only be linked from that module's own messages and steps. |